I rarely ever replace stuff that is not truly worn out. I have never seen the need to throw good used parts away just because they are “used”. Having ran a transmission business for nearly 30 years I can assure you I have had more part failures from “brand new” parts than I have over “good used” parts. I inspect and then replace, only “as needed” when working on old Saabs.
But them along came my 1957 Saab model 93 that we are restoring from the frame up. The front A-Arm bushing were good enough to use except the rubber was cracking along the out side edges. Just an appearance issue, but since this car is all about “appearance” I decided to change them out. I had some re-production ones in stock that I had received from Sweden a few years ago from the Swedish Saab Club spare parts, run by the late Rolf Jensen.
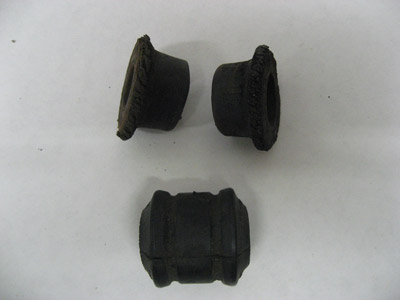
Getting the old ones out was easy since they split apart into two pieces. However the new ones were made as a solid, one-piece unit. I trying to use a hand press to press them into the very small hole in the A-arm bracket but with no luck, so I decided to email Rolfe to see if he used any tricks in Sweden. He replied no, “just press them in”. Yes, I had tried that, but the little buggers just keep slipping around getting out of alignment and any further pressing would have cut the rubber into shreds.
Old two piece bushing on the top and the new single piece replacement on the bottom.

I tried a little more lube and an extra pair of hands with no luck. The bushing is just too darn big as a one-piece unit to fit that small hole! About then my Service Manager, Steve Davis, walked by looked at what I was doing and said, “Why don’t you just get a long bolt and screw them in?”
I thought about what he said for a second then the lit went off in my brain. That’s right, just use a long bolt and nut and pull the pieces together. We do this working on transmission seals every now and then and I had even made a tool years ago for installing Chrysler linkage seals into the cases in this fashion.
Some times you just need another pair of eyes…. not hands!
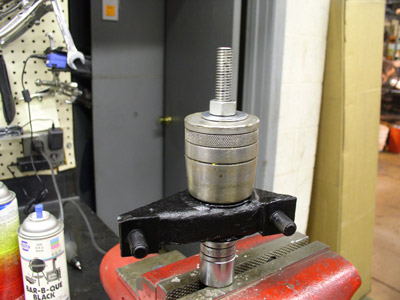
I grabbed some 3/8” ready rod, washers, nuts, and a couple sockets.
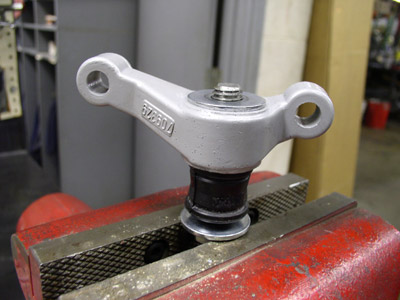
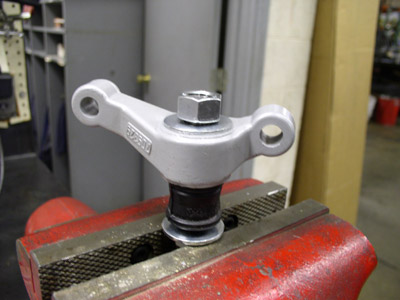
The idea is to have one washer push on the inner part of the bushing and another washer to pull on the outside of the arm. This stretches the rubber out and makes assembly easy. I did use some Vaseline to help lube the hole.
Very simple to make and worked so slick and easy. Had them all in place in just a few minutes.
Place everything together in a vise and then just put a washer on the top…

Then put the nut on and tighten! Easy as 1, 2, 3

On this one I needed a couple sockets to make it work properly.

Not real hard stuff I know but sometimes the easier things can trip you up. And when you restoring the old Saab of your dream, time lost in the shop is time not spent driving or telling stories about your beauty! And yes I saved my “old used” bushing for another car!
Safe Saab’ in,
Tom Donney

A shop press and dawn dish soap works, too.
These are on my list of must-always-replace. They make a big difference in handling.